Wednesday, October 27, 2010
A First Timer - Whole Wheat Bread in 5 Minutes a Day
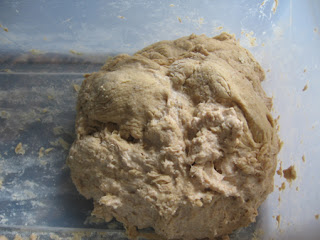
OK. Let's make this clear right at the begining. It took more than 5 minutes. In fact, this bread, took 24 hours. About. I started it yesterday when I mixed the dough and finished it today when I shaped the loaf and baked it. The actual shaping of the loaf took less than 5 minutes though. Still, this bread is well worth the effort. I used a recipe from Healthy Bread in Five Minutes a Day: 100 New Recipes Featuring Whole Grains, Fruits, Vegetables, and Gluten-Free Ingredients, a great book that takes a new and, admittedly, radical approach to making bread. I am very impressed with the result. The loaf looks great, and the taste is fantastic. Also, it has a nice chewy crust and a soft crumb. I toasted a thick slice, put a few pieces of Gouda (which slightly melted on the warm bread) and who needs more? What is a little disconcerting, is that the dough is so wet. It is almost like a starter, except that it doesn't get mixed into additional ingredients. The mixture from Day 1 is the bread!! It really is simple, and so tasty. Maybe not 5 minutes, but well worth the extra time for great results. You won't be sorry!
Here's What You'll Need (for 1 1 1/2 lb. - 680 g.- loaf):
2 cups less 1 Tablespoon (270 g.) whole wheat flour
1 cup less 3 Tablespoons AP flour (100 g.)
1 teaspoon yeast
1 teaspoon kosher salt
1 Tablespoon (13 g. ) wheat gluten
1 1/5 cups (390 ml.) warm water
Here's What You'll Need to Do:
1. Mix together all the dry ingredients in a plastic container with a lid. It should not be air-tight as the gases will build up. But it should be covered so the dough does not dry out.
2. Mix in the water just enough to make sure everything is dampened. You do not need to knead this dough, just be sure it is mixed thoroughly.
3. Allow the dough to rise in the container, covered, until it doubles.
4. Do not punch down the dough!! Instead, place the container, covered, into the refrigerator at least for 3 hours (preferably overnight).
The next day...
1. Prepare a baking tray (or a peel if you have one - I don't) by coating liberally with flour.
2. Gently remove the dough from the container
and, by stretching and shaping, make a ball. Place this shaped loaf on the prepared peel (or board).
3. Cover the dough with oiled plastic wrap for 90 minutes (or 30 minutes if using at room temperature) to rest. It will not rise much, if at all.
4. Meanwhile, about 30 minutes before baking, place an oven tray on the bottom of the oven and a baking stone on the middle rack. Pre-heat the oven to 450 F (220 C).
5. When the oven is ready, pour about 1 cup boiling water into the oven tray and quickly close the door to create a steamy environment.
6. Just before placing in the oven, brush water on the bread, then sprinkle seeds. Slash the bread with a serrated knife to allow gases to escape and for the bread to rise evenly.
6. Place the dough directly on the baking stone (or if on a baking sheet place the sheet directly on the stone).
7. Bake for about 45 minutes. Cool on a rack completely before slicing.
Labels:
5 minute bread,
chewy crust,
overnight,
whole wheat bread
Friday, October 22, 2010
Not Yo' Mama's Italian Bread
Time was, that going to an Italian bakery meant something special. By that I mean, some kinds of bread are closely associated in our minds with their ethnic origins. For example, if asked to think of French bread, you will almost immediately think of the crusty baguettes, long and thin, with the chewy crust and soft interior. Perfect for butter and a nice sharp cheese. Unfortunately, for most people, Italian bread has come to mean something similar only softer. In truth, there are many types of Italian bread, from the rustic Pane Tuscana, which is very crusty and chewy (also no salt so eaten with salty foods usually), to the crusty dinner rolls found at almost all Italian restaurants. Modern bakeries, in their quest to speed things up (for increased volume and profits) have sacrificed flavor and texture. When we deliberately slow things down, in other words, work with dough that is fermented for a long time, we can coax out the flavors in the wheat that we otherwise sacrifice. If you are willing to start the bread today but only eat it tomorrow, then the whole world of complex flavor and texture opens up to you.
I have written in the past about using various starters. One I have used before is called pate fermente. This is French in origin and is essentially the formula for baguette dough, only put in the refrigerator overnight to ferment slowly. This bread, called simply Italian bread, harks back to the days before factory bakeries, when even commercial breads were shaped by hand and proofed slowly. It uses a starter called a biga, which is Italian in origin and similar to the pate fermente. On the second day, the starter is allowed to come to room temperature, then mixed with the other ingredients to make a chewy bread with a soft crumb, perfect for sandwiches (or sopping up the gravy of a great bolognese sauce. It is an adaptation from a recipe inThe Bread Baker's Apprentice: Mastering the Art of Extraordinary Bread. An exceptional book BTW and one everyone should have on his/her bookshelf.
Here's What You'll Need:
for the biga
2 1/2 cups (320g) flour
1/2 teaspoon yeast
3/4 cup plus 2 Tablespoons to 1 cup (200 to 230g) water at room temperature
1. Stir together the flour and the yeast, then slowly add the water to form a shaggy dough. Remove it to a lightly floured tabletop and knead for a few minutes until smooth. Then place in a lightly oiled bowl, turn to coat, then cover and let it ferment for 2 to 4 hours. It will rise until doubled but, as you can see it takes a while.
2. Remove it from the bowl, then remove the gas gently. Place it back it the bowl, cover and place in the refrigerator overnight.
The next day...
Here's What You'll Need for the Dough:
all the biga from yesterday
2 1/2 cups (350g) flour
1 2/3 teaspoons salt
1 Tablespoon sugar
1 teaspoon yeast
1 Tablespoon olive oil
3/4 cup to 3/4 cup plus 2 Tablespoons (200 to 230g) water (or milk)
Here's What You'll Need to Do:
1. Remove the biga from the refrigerator about an hour before using so it comes to room temperature. Cut it into about 10 pieces and cover with a towel while it warms up.
2. Mix together the flour, sugar, salt and yeast.Then add the biga pieces, the olive oil and the water.
Using a mixer, mix it all together until it forms a smooth ball that 'cleans the bowl' of the mixer.
3. Remove the dough from the bowl and knead it on a lightly floured tabletop for about 10 minutes until it is smooth and tacky (but not sticky). Then, place it in a lightly oiled bowl, turn to coat and cover. Let it ferment at room temperature for at least 2 hours.
4. If you are making loaves, gently divide the dough into 2 equal pieces, form them into loaves while being careful not to de-gas the dough any more than necessary. Place the dough in prepared loaf pans.
5. If making rolls, divide the dough into 9 equal pieces, about 50g each (about 2 oz.). Gently shape them to be tapered at the end, like Italian 'torpedo rolls'.
6. Either way, cover and let them rise for another hour until they are about 1 1/2 time their original size.
7. Heat the oven to 475 F (240 C). Place an empty loaf pan on the bottom. If using a baking stone, place the pan under the stone. When the oven is heated, and the bread has risen, pour about a cup of boiling water into the pan and quickly close the door. After a few seconds spray the walls of the oven with water and close the door. Do this again after another 20 seconds or so.
8. Lower the temperature to 425 F (220 C), slash the bread, then place the bread in the oven. Bake for 20 minutes for loaves or 15 minutes for rolls.
9. Cool on a rack.
These rolls make great sandwiches. Yum!!
Labels:
biga,
Italian Bread,
torpedo rolls
Tuesday, October 19, 2010
Brunch and Mediterranean 'Style' rolls
There is something to be said for authenticity in cooking and baking. If you are trying to make French pastry, for instance, then by all means use real butter and cream, use 100% pastry flour and the 'correct pots and pans. French cooking is deservedly famous, and should be copied and learned. Sometimes, however, we want to capture the essence of a style of cooking or baking, while at the same time compromising a little on the authenticity of the recipe. Sometimes it's because we don't have all the ingredients on hand. Or sometimes we 'invent' a recipe by creating something using the type of ingredients that typify a style. So, for instance, if I make a rice dish and use soy sauce, tamari sauce and pomegranate concentrate for the sauce, I will produce a Chinese-'style' rice dish without the dish being authentically Chinese.
So it is with these rolls, so delicious with breakfast and brunch type foods (salads and spreads) yet probably not native to any single area in the Mediterranean area. After all, when you think of the Mediterranean, what foods do you think of? Olive oil, of course. And rosemary or some aromatic herb (oregano or thyme). Tomatoes in all forms. Oh, and more olive oil. Different areas place a different emphasis on each ingredient, but they are really a variation on a theme... There are other foods as well but you get the point. These rolls are delicious and include lots of things typically from the Mediterranean area. You'll love them, I'm sure.
Here's What You'll Need:
400-450 g flour
300 g water
100 g Parmigiano Reggiano Cheese
7 g instant yeast
2 tsp honey
1 tsp salt
1/2 tsp rosemary
50 g olive oil (about 4 T)
Here's What You'll Need To Do:
1. Dissolve yeast and honey in 150 ml of warm water, cover and leave in a warm place to rise for 10-15 minutes.
2. In a bowl sift flour and salt, add the finely grated cheese, stir.
3. Make a well and pour the yeast and remaining water, Knead to a soft dough.
4. Shape it into balls and place in a greased bowl, cover it with cloth and leave in a warm place to rise until doubled in volume.
5. Pour the risen dough on work surface, cut it to 8 equal parts.
6. Shape rolls, place them in greased or parchment paper covered baking tray. Allow rolls to rise for 20-30 minutes.
7. Brush them with olive oil, sprinkle with rosemary.
8. Bake them 20-30 minutes in preheated oven to 350 degrees F.
Labels:
brunch,
Mediterranean rolls,
olive oil
Wednesday, October 13, 2010
Time for Breakfast - Cornmeal Muffins
This recipe is a bit of a continuation of the post for banana bread from last week as it, too, uses baking powder to rise the dough instead of yeast. It is a simple recipe that is very quick to put together. It uses the 'muffin method' for quick breads. By that I mean, the wet ingredients and the dry ingredients are mixed separately then mixed together. The muffins are placed immediately in a pre-heated oven to 'pop' and crown. The use of cornmeal is very typically American and makes for a very crumbly (and very tasty) muffin. To avoid the graininess you sometimes get with cornmeal, it is mixed first with hot water and oil, and only afterwards is it added to the other wet ingredients. The addition of dried fruit only adds to the sweetness and makes this a wonderful breakfast bread. You can find a great collection of muffin recipes in The Bread Bible: 300 Favorite Recipes, a cookbook that should be in everyone's collection. Not a typical muffin but well worth trying. Believe me, you'll love it!
Here's What You'll Need:
1 1/4 cups cornmeal
1/3 cup very hot water
3/4 cup vegetable oil
3 large eggs
3/4 cups granulated sugar
1 teaspoon salt
1 teaspoon vanilla extract
1 1/4 cups all-purpose flour
1 Tablespoon baking powder
about 1 cup assorted dried fruit chopped coarsely ( I used cranberries and apricots)
Here's What You'll Need to Do:
Pre-heat the oven to 425 F (220 C).
1. Place the cornmeal in a large bowl then add the hot water and the oil and set it aside to soak. It should stand for at least 15 or 20 minutes.
2. In another bowl, whisk together the eggs with the sugar, salt and vanilla extract.
3. In yet a third bowl, mix the flour with the baking powder.
4. Mix the egg and sugar mixture to the cornmeal mixture, mixing to incorporate. Finally, mix this mixture into the flour mixture. Mix only to combine. It is OK if there are a few lumps.
5. Sprinkle the chopped dried fruit over the batter and mix only very slightly to incorporate.
6. Spoon the batter,, getting some fruit in each scoop, into a prepared muffin pan filling almost to the top. By filling to the top, and keeping the sugar content lower, the muffins will 'peak' and not spread too much in the oven.
7. Bake for 5 minutes then lower the temperature to 350 F (170 C) and bake for another 20 minutes or until just brown.
8. Let the muffins sit in the pan for about 10 minutes before removing them from the pan to a rack to cool.
9. Bon appetit!
Labels:
breakfast bread,
cornmeal,
muffins,
quick bread
Friday, October 8, 2010
An Old World Bread with Whole Wheat Flour and Chickpeas
While it is well-known that the first humans came from what is today East Africa (Kenya and Tanzania mostly), the first agricultural communities developed in the Middle East. The city of Jericho, with remnants of a settlement going back some 10,000 years claims to be the oldest. And all over the Middle East are cities and towns with past histories spanning many thousands of years. One of the very first domesticated plants, a plant grown from seeds from year to year was wheat, and bread, is one of the very first foods that was cooked (baked in an open fire most likely) and not eaten raw. It grows wild in the Middle East to this day. Other grains, whose seeds were gathered, then saved and re-planted in the spring include barley, and chickpeas. In the West they are also called garbanzo beans, although technically, they are seeds, not beans. They do not, as far as I know, grow in a pod. Whatever. Chickpeas remain very popular throughout the Middle East. They are, of course, the main ingredient in the ever present hummus dip. And they find themselves in sauces, dips and baked dishes everywhere.
In the health food community, and in the gluten-free communities, they also are popular both because of their great health benefits (fiber, protein minerals and vitamins etc.) and also because, when dried they can be ground into a gluten-free flour. This unusual bread adapted from a recipe in The Laurel's Kitchen Bread Book: A Guide to Whole-Grain Breadmaking .
It uses mashed, cooked chickpeas (not hummus which is flavored with spices) as well as whole wheat and all-purpose flour. Needless to say, it is super-healthy and just as important, it is delicious. Enjoy!
Here's What You'll Need for 1 loaf:
1 cup of cooked chickpeas
1 teaspoon of active dry yeast dissolved in 1/4 cup (60ml) warm water
1 1/4 cups whole wheat flour
1 1/4 cups all-purpose flour
1 1/4 teaspoons salt
1 Tablespoon honey
cooking water from chickpeas plus more water to make 1 cup liquid
1/8 cup (2 Tablespoons) olive oil (optional)
Here's What You'll Need to Do:
1. Cook the chickpeas in the water until very soft. If you are using canned chickpeas, this will take only a few minutes. If you are using dry beans, it can take as much as 3 hours of slow cooking. You decide. When they are done, drain, but save the water, then mash the chickpeas to as smooth as possible with a fork. Set aside.
2. Dissolve the yeast in the warm water. Dissolve the honey in the liquid (cooking water plus more to make 1 cup plus oil if using).
7. Bake at 350 F (175 C) for about 30 minutes or until a rich golden brown and it sounds hollow when tapped on the bottom.
8. Cool on a rack and store carefully to prevent it drying out. Enjoy!
In the health food community, and in the gluten-free communities, they also are popular both because of their great health benefits (fiber, protein minerals and vitamins etc.) and also because, when dried they can be ground into a gluten-free flour. This unusual bread adapted from a recipe in The Laurel's Kitchen Bread Book: A Guide to Whole-Grain Breadmaking .
It uses mashed, cooked chickpeas (not hummus which is flavored with spices) as well as whole wheat and all-purpose flour. Needless to say, it is super-healthy and just as important, it is delicious. Enjoy!
Here's What You'll Need for 1 loaf:
1 cup of cooked chickpeas
1 teaspoon of active dry yeast dissolved in 1/4 cup (60ml) warm water
1 1/4 cups whole wheat flour
1 1/4 cups all-purpose flour
1 1/4 teaspoons salt
1 Tablespoon honey
cooking water from chickpeas plus more water to make 1 cup liquid
1/8 cup (2 Tablespoons) olive oil (optional)
Here's What You'll Need to Do:
1. Cook the chickpeas in the water until very soft. If you are using canned chickpeas, this will take only a few minutes. If you are using dry beans, it can take as much as 3 hours of slow cooking. You decide. When they are done, drain, but save the water, then mash the chickpeas to as smooth as possible with a fork. Set aside.
2. Dissolve the yeast in the warm water. Dissolve the honey in the liquid (cooking water plus more to make 1 cup plus oil if using).
3. Mix together the flours and the salt, then add the liquids and the yeast mixture to the dry ingredients. Mix together and knead to form a soft, slightly tacky dough. It will be quite supple and elastic.
A quick way to do this is to use a food processor. A minute or two of mixing, using the steel blade and you are done. Just mix until the dough forms a ball and starts circling the processor bowl. You may find you need to add a bit (as much as 1/4 to 1/2 cup) of flour since the whole wheat absorbs more liquid than regular. Let the dough be your guide.
4. Place the dough in a lightly-oiled bowl, covered, until doubled. This can take 1 1/2 hours.
5. Punch down the dough, gently then flatten it to an even disk and leave it, covered, for about 20 minutes to relax.
6. Finally, shape the dough into a loaf shape, the length of your loaf pan, and let it rise, again covered until it fills the pan. This can take another hour.
8. Cool on a rack and store carefully to prevent it drying out. Enjoy!
Labels:
chickpeas,
hummus,
whole wheat bread
Wednesday, October 6, 2010
A Southern Treat - The Perfect Biscuit
The first time I encountered a good Southern biscuit was in 1977. I remember it very clearly. My wife and I were still 'young marrieds', and we had gone on a road trip with her parents to Atlanta, GA. Well, what can I say. Here I was, a country mouse in the city. As you can imagine, I had never really experienced large American cities before. Sure we had visited Baltimore, where she grew up, but Atlanta was just huge. I had never seen anything like it. To top it off, there was this accent, which to my Eastern Canadian ears was some kind of lingua incognita... what was that!! The first morning, at the hotel breakfast bar I was introduced to the Southern biscuit. When, out of curiosity I asked the waitress what kind of biscuits they were she replied in her best Southern "I dunno, dey's jest biscuits!".
Now in the South, they take their biscuits seriously. Every self-respecting cook has his/her own recipe and everyone claims to be the champ. This is not anything like a Northern biscuit and is not cake-like at all. It is a combination of a bread using both chemical leaveners (baking powder and baking soda) along with yeast. The result is light and fluffy, flaky, bready and just plain delicious. In the Old South the fat of choice was usually lard - good quality lard. Most modern cooks as well as hotels, have long ago abandoned it in favor of butter or margarine. Since I will not accept the responsibility of recommending a cardiologist, I have done the same. You must try these, they will change your idea of biscuits forever.
Here's What You'll Need: (for about 25 biscuits)
5 cups all-purpose flour
3 tsp. baking powder
1 tsp. baking soda
1 tsp. salt
3 Tbs. sugar
3/4 cup margarine
2 cups buttermilk (or 2 cups milk and 2 Tbs. vinegar)
2 1/2 tsp. to 1 Tbs. yeast dissolved in 1/2 cup water
Here's What You'll Need to do:
1. Mix dry ingredients together.
2. Cut in margarine until well mixed.
3. Add buttermilk and dissolved yeast all at once. Stir until all flour is moistened.
4. Store in container in refrigerator at least 2 hours before using. (Better to wait one day.)
5. On floured board, roll out desired amount of dough and cut with 2 inch biscuit cutter.
6. Brush with melted butter just before placing in oven.
7. Bake at 400 degrees (preferably on a preheated cast iron baker) for 12 minutes or until golden brown.
8. Brush with melted butter immediately after removing from oven, if desired.
These biscuits dry fairly quickly so keep them well covered. Actually, you'll find they are gone before you have to worry about that, but still...
Labels:
buttery,
flaky,
fluffy,
Southern biscuits
Sunday, October 3, 2010
Breakfast time - Banana Bread
This post is a little bit of a departure for me and, hopefully, the start of a new phase in the life of breadmanTalking. The thing is, there are all kinds of bread as you know. Up until now, I have mostly concentrated on the 'yeasty' type of bread. You know, traditional loaves that take 2 or more rises. Sometimes overnight, or even longer. Sandwich breads, or artisan breads. Maybe some more 'peasant' type breads from around the world. Like flat breads. Pita, and tortilla and chapatti.
Every baking book for bread includes yeast breads, of course. But also breads that depend on chemical leaveners for rising. These are often called 'quick' breads because, well, they're quick. And the reason they are quick is that they use either baking soda or baking powder (or both) to make the bread rise. Usually these breads are sweeter than yeast breads. In terms of texture, they fall in between yeast breads and cake. But they are bread, using much less sugar or other sweetener than cake, and much more flour.
I happen to love banana bread and for sure there are thousands of recipes out there. But I was looking for something a little different. The bread I wanted had to be healthy. In other words, I wanted to use whole wheat flour, and olive oil (but light so as to minimize the flavor of the oil). Also, for the cholesterol conscious, I used only egg whites instead of complete eggs. The yolks, after all provide cholesterol while the whites (almost pure protein) help give the bread structure (and protein). I am sure you'll love what I've come up with.
Here's what you'll need:
1 cup (250ml) mashed bananas (2 medium)
1/2 cup (125ml) unflavoured low fat yogurt
1 tsp (5ml) baking soda
2 egg whites
3/4 cup (175ml) brown sugar
1/4 cup (60ml) light (light-tasting) olive oil
1 tsp (5ml) vanilla
1 cup (250ml) all-purpose flour
1 cup (250ml) whole-wheat flour
1 tsp (5ml) baking powder
pinch salt
optional: 1 cup (250ml) walnuts or chopped chocolate pieces*, or half and half of each.
Here's what you'll need to do:
You will need 3 bowls. Two small ones and one larger for mixing it all together.
1. In a small bowl, combine bananas, yogurt and baking soda.
2. In a separate bowl, combine egg whites, sugar, oil, and vanilla. Blend well.
3. In a large bowl, combine flours, baking powder and salt. Mix together well.
4. Combine banana mixture with oil mixture. Add to dry ingedients in a large bowl an stir together just until moistened.
5. Add walnuts and/or chocolate if desired.
6. Spoon batter into a non-stick, lightly oiled, or parchment-lined 8 x 4 inch (1.5L) loaf pan.
Bake in preheated 350F (180C) oven for about 40 minutes, or until thermometer inserted into loaf reaches at least 190F (88C).
7. Let the loaf cool for about 10 minutes or so in the pan then remove it and let it cool completely on a cooling rack.
This bread is great as is, or with some fruit jam spread on top.
Enjoy!
Subscribe to:
Posts (Atom)